Sat: 8 AM - Noon PST
+ Free Shipping


How To Apply Hair Extensions
How To Apply Hair Extensions
Helpful Videos for Hairdo Extensions
How to: 22in Straight Extension by Hairdo
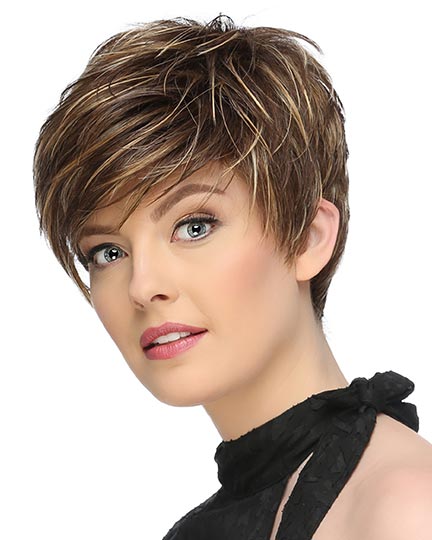
The 22-in Straight Extension by Hairdo will help create a stunning mane. This one-piece multi-level extension is quick and easy to use! Short hair falls below the shoulder. Long hair appears more thick and luxurious.
16in FineLine Extension by Hairdo
Fiber: Heat Friendly Synthetic

16in FineLine Extension by Hairdo
Fiber: Heat Friendly Synthetic

16in FineLine Extension by Hairdo
Fiber: Heat Friendly Synthetic
Helpful Videos for Hairdo Extensions
How to: 22in Straight Extension by Hairdo
The 22-in Straight Extension by Hairdo will help create a stunning mane. This one-piece multi-level extension is quick and easy to use! Short hair falls below the shoulder. Long hair appears more thick and luxurious.
~~~
How to: 16in FineLine Extension by Hairdo
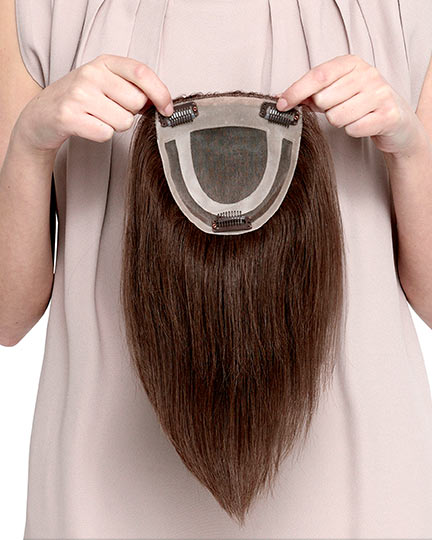
The 16" Fineline Extension by Hairdo features hair that is stitched to a thin polyurethane layer, resulting in a lighter, thinner, virtually undetectable piece that lays flat to the head for a more comfortable, natural look.
~~~
How to: 16in Remy Human Hair 5pc Extension Kit by Hairdo
The 16" Remy Human Hair Extensions bring all the luxury, length and volume of expensive salon extensions by using 100% Remy human hair for the most natural look. These Hairdo extensions are made easy with invisible pressure-sensitive clips.
~~~
How to: 18in Remy Human Hair 10pc Extension Kit by Hairdo
This clip-in extension kit by Hairdo includes 10 pieces of 18-inch long, 100% Remy human hair extensions for stunning luxe volume and gorgeous length! Instantly achieve the look of expensive salon extensions without glue, tape or commitment. Cut and heat-style the extensions for a customized look.
The Steps for Applying a Weft Piece Kit
Clip in hair extensions are a great way to add length, volume, or color without causing damage to your own hair. They are a viable alternative to permanent extensions. At ElegantWigs.com™ you are able to choose from a refine selection of 100% human hair extensions in numerous colors and various lengths.
The instructions below for applying weft clip-in extensions is for a 10 piece kit, but can easily be adapted for any number of weft pieces. There are also lots of youtube videos showing how to attach extensions that might also be helpful.
Clip in hair extensions are a great way to add length, volume, or color without causing damage to your own hair. They are a viable alternative to permanent extensions. At ElegantWigs.com™ you are able to choose from a refine selection of 100% human hair extensions in numerous colors and various lengths.
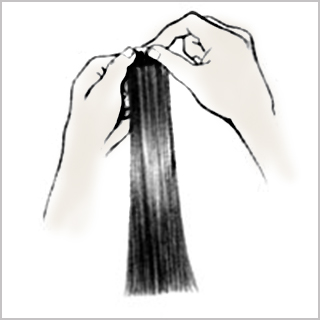
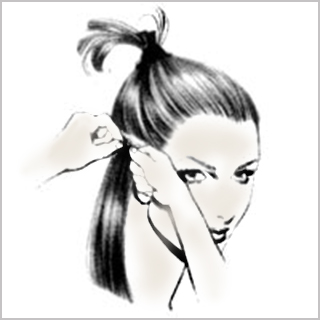
Step 1: Practice Opening and Closing the Clip
Practice opening and closing the clips in the extensions before you begin so you understand how they work and feel.
With the clip side of the extension piece facing you place both thumbs on each side of the clip, and your index fingers at the front side of the extension. You may snap the clip open by applying pressure towards yourself with your index fingers. Alternately, you may close the clip by applying pressure away from yourself with your thumbs.
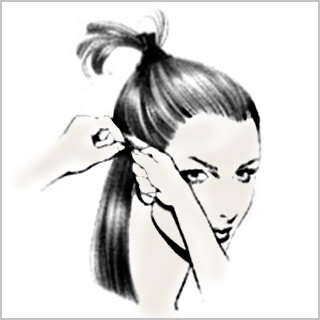
Step 2: Practice Attaching the Hair
Practice attaching the hair by using one of the 1.5" side pieces. Create a part line above your ear extending back along the side of your head where you want to attach the extension. Gather your hair up and away from your face. Work on attaching and removing the extension piece from just below the part line above your ear.
Steps 1-3 are all for practice purposes. Once you feel comfortable with these steps, proceed to Step 4.
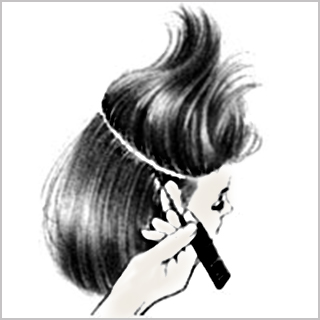
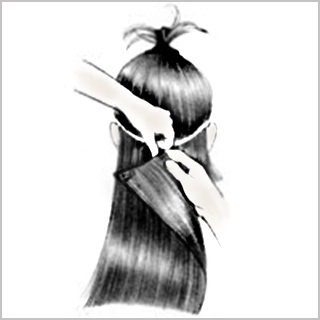
Step 3: Practice Separating the Hair
Using a tail comb or your index fingers, practice parting the hair where you wish to attach the first extension.
The clip-in extensions should be attached from the bottom up. Starting at the lowest point on the hairline, and using the tail comb or your index fingers, create a part where you wish to section off the hair. Pull up the hair above the part line and gather it to keep it out of the way.
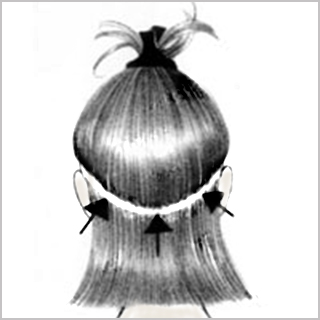
Step 4: Starting: The Lowest and First Part
You are now ready to start. These instructions are for the 10 piece extension kits.
The clip-in extensions should be attached from the bottom up. Starting at the lowest point on the hairline, and using the tail comb or your index fingers, create a part where you wish to section off the hair.
Lift up all the hair above the part and clip it out of the way.
Step 5: Prepare the First Weft Extension
Select one of the wider "back" wefts. If working with a complete kit, and you are planning on three layers of extensions, use the 6" width weft. You may use both 6" weft extensions on this lowest layer, if you wish.
Snap open all the clips.
Smooth out the hair, so the extension is easier to handle.
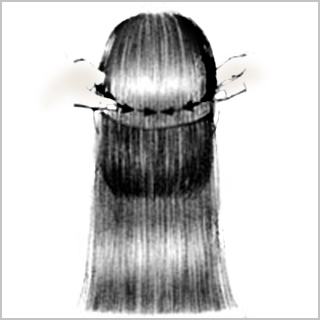
Step 6: Placement of the First Weft
With your hair above the part, pulled up and clipped out of the way, place the clips from the top edge of the weft onto your own hair below the part so that the top of the weft is even with the part.

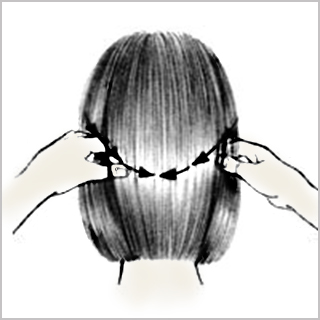
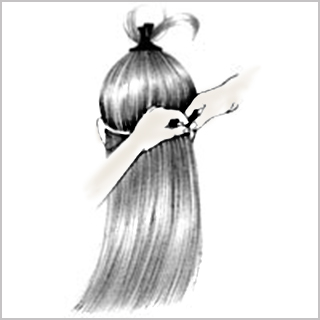
Step 7: Placement of the First and Second Clip
The middle clip should be placed first. If you are using only one weft extension, locate the middle of the nape and place the center clip on your own hair just below the part. Moving the clip downward, catch your hair in the clip and snap it shut.
The clip to the right of the center clip is attached next. Holding the middle clip in place with your left hand, use your right hand to move the right edge of the weft as far as it will go around your head. Then place the clip on your hair just below the part, and moving the clip downward, catch your hair in the clip and snap it shut.
If you are using the two 6" extensions, you need to balance them around your head. The middle of the nape is where the two wefts should meet.
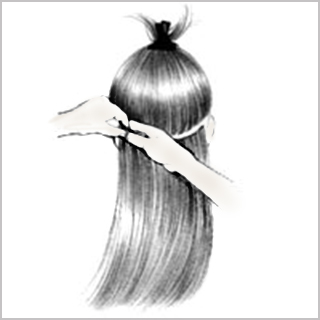
Step 8: Placement of the Third Clip
Finally, to attach the left clip, hold the middle clip in place with your right hand, and use your left hand to move the left edge of the weft as far as it will go around your head.
Place the left extension clip on your hair just below the part line. Move the clip downward, catch your hair in the clip and snap it shut.
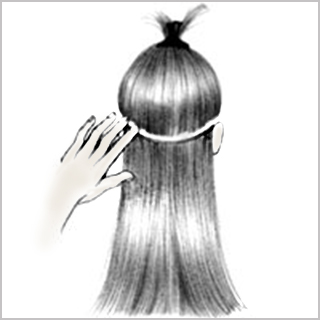
Step 9: Check for Gaps
Now that all three clips are attached, run your fingers along the weft to make sure it lies flat against your head along the entire width of the first weft.
If there are any gaps, correct this by snapping the clip open, lifting it off your hair and repositioning it so that the weft lies flat.
Step 10: Preparing to Place the Second Weft
The second large weft will be placed above the first weft. Release all the hair that was clipped out of the way. Then, slightly above the weft that was just attached, make another part with the released hair by using a tail comb or your index fingers.
Lift up all the hair above the part and clip it out of the way.
Step 11: Placing the Second Weft
The middle clip should be placed first. Locate the middle of the nape and place the center clip on your hair just below the part. Moving the clip downward, catch your own hair in the clip and snap it shut.
The clip to the right of the center clip is attached next. Holding the middle clip in place with your left hand, use your right hand to move the right edge of the weft as far as it will go around your head. Then place the clip on your hair just below the part, and moving the clip downward, catch your hair in the clip and snap it shut.
Finally, to attach the left clip, hold the middle clip in place with your right hand, and use your left hand to move the left edge of the weft as far as it will go around your head. Place the clip on your hair, moving the clip downward to catch your hair in the clip and snap it shut. Check for any gaps.
If you have a third weft you want to add, follow the same procedure you did for the second weft.
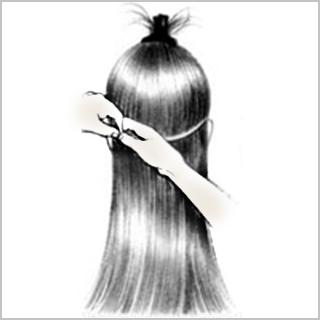
Step 12: Placement of the Side Wefts
The four 1.5" wefts from a 10 piece hair extension kit are meant to be attached to the sides of your head. Using two for each side, attach the first one just above the ear and the second one around the temple area following the same routine of creating a part, lifting the hair up above the part, placing the clip on your hair below the part line, moving the clip downward to catch your hair in the clip and snapping it shut.
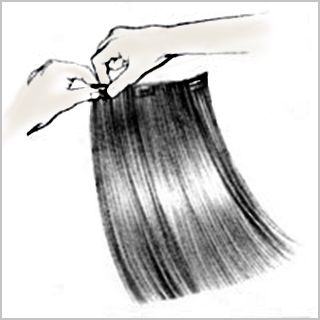
Step 13: Removing the Extension Wefts
Never try to remove any extension wefts without opening all the clips- sides and center.
To remove an extension weft, snap open all the clips and gently lift up and away from your hair.
Pulling or tugging to remove a weft can result in damage to your own hair.
Practice opening and closing the clips in the extensions before you begin so you understand how they work and feel.
With the clip side of the extension piece facing you place both thumbs on each side of the clip, and your index fingers at the front side of the extension. You may snap the clip open by applying pressure towards yourself with your index fingers. Alternately, you may close the clip by applying pressure away from yourself with your thumbs.
16in FineLine Extension by Hairdo
Fiber: Heat Friendly Synthetic
16in FineLine Extension by Hairdo
Fiber: Heat Friendly Synthetic
16in FineLine Extension by Hairdo
Fiber: Heat Friendly Synthetic
Helpful Videos for Hairdo Extensions
How to: 22in Straight Extension by Hairdo
The 22-in Straight Extension by Hairdo will help create a stunning mane. This one-piece multi-level extension is quick and easy to use! Short hair falls below the shoulder. Long hair appears more thick and luxurious.
~~~
How to: 16in FineLine Extension by Hairdo
The 16" Fineline Extension by Hairdo features hair that is stitched to a thin polyurethane layer, resulting in a lighter, thinner, virtually undetectable piece that lays flat to the head for a more comfortable, natural look.
~~~
How to: 16in Remy Human Hair 5pc Extension Kit by Hairdo
The 16" Remy Human Hair Extensions bring all the luxury, length and volume of expensive salon extensions by using 100% Remy human hair for the most natural look. These Hairdo extensions are made easy with invisible pressure-sensitive clips.
~~~
How to: 18in Remy Human Hair 10pc Extension Kit by Hairdo
This clip-in extension kit by Hairdo includes 10 pieces of 18-inch long, 100% Remy human hair extensions for stunning luxe volume and gorgeous length! Instantly achieve the look of expensive salon extensions without glue, tape or commitment. Cut and heat-style the extensions for a customized look.
The Steps for Applying a Weft Piece Kit
Clip in hair extensions are a great way to add length, volume, or color without causing damage to your own hair. They are a viable alternative to permanent extensions. At ElegantWigs.com™ you are able to choose from a refine selection of 100% human hair extensions in numerous colors and various lengths.
The instructions below for applying weft clip-in extensions is for a 10 piece kit, but can easily be adapted for any number of weft pieces. There are also lots of youtube videos showing how to attach extensions that might also be helpful.
Clip in hair extensions are a great way to add length, volume, or color without causing damage to your own hair. They are a viable alternative to permanent extensions. At ElegantWigs.com™ you are able to choose from a refine selection of 100% human hair extensions in numerous colors and various lengths.
Step 1: Practice Opening and Closing the Clip
Practice opening and closing the clips in the extensions before you begin so you understand how they work and feel.
With the clip side of the extension piece facing you place both thumbs on each side of the clip, and your index fingers at the front side of the extension. You may snap the clip open by applying pressure towards yourself with your index fingers. Alternately, you may close the clip by applying pressure away from yourself with your thumbs.
Step 2: Practice Attaching the Hair
Practice attaching the hair by using one of the 1.5" side pieces. Create a part line above your ear extending back along the side of your head where you want to attach the extension. Gather your hair up and away from your face. Work on attaching and removing the extension piece from just below the part line above your ear.
Steps 1-3 are all for practice purposes. Once you feel comfortable with these steps, proceed to Step 4.
Step 3: Practice Separating the Hair
Using a tail comb or your index fingers, practice parting the hair where you wish to attach the first extension.
The clip-in extensions should be attached from the bottom up. Starting at the lowest point on the hairline, and using the tail comb or your index fingers, create a part where you wish to section off the hair. Pull up the hair above the part line and gather it to keep it out of the way.
Step 4: Starting: The Lowest and First Part
You are now ready to start. These instructions are for the 10 piece extension kits.
The clip-in extensions should be attached from the bottom up. Starting at the lowest point on the hairline, and using the tail comb or your index fingers, create a part where you wish to section off the hair.
Lift up all the hair above the part and clip it out of the way.
Step 5: Prepare the First Weft Extension
Select one of the wider "back" wefts. If working with a complete kit, and you are planning on three layers of extensions, use the 6" width weft. You may use both 6" weft extensions on this lowest layer, if you wish.
Snap open all the clips.
Smooth out the hair, so the extension is easier to handle.
Step 6: Placement of the First Weft
With your hair above the part, pulled up and clipped out of the way, place the clips from the top edge of the weft onto your own hair below the part so that the top of the weft is even with the part.
Step 7: Placement of the First and Second Clip
The middle clip should be placed first. If you are using only one weft extension, locate the middle of the nape and place the center clip on your own hair just below the part. Moving the clip downward, catch your hair in the clip and snap it shut.
The clip to the right of the center clip is attached next. Holding the middle clip in place with your left hand, use your right hand to move the right edge of the weft as far as it will go around your head. Then place the clip on your hair just below the part, and moving the clip downward, catch your hair in the clip and snap it shut.
If you are using the two 6" extensions, you need to balance them around your head. The middle of the nape is where the two wefts should meet.
Step 8: Placement of the Third Clip
Finally, to attach the left clip, hold the middle clip in place with your right hand, and use your left hand to move the left edge of the weft as far as it will go around your head.
Place the left extension clip on your hair just below the part line. Move the clip downward, catch your hair in the clip and snap it shut.
Step 9: Check for Gaps
Now that all three clips are attached, run your fingers along the weft to make sure it lies flat against your head along the entire width of the first weft.
If there are any gaps, correct this by snapping the clip open, lifting it off your hair and repositioning it so that the weft lies flat.
Step 10: Preparing to Place the Second Weft
The second large weft will be placed above the first weft. Release all the hair that was clipped out of the way. Then, slightly above the weft that was just attached, make another part with the released hair by using a tail comb or your index fingers.
Lift up all the hair above the part and clip it out of the way.
Step 11: Placing the Second Weft
The middle clip should be placed first. Locate the middle of the nape and place the center clip on your hair just below the part. Moving the clip downward, catch your own hair in the clip and snap it shut.
The clip to the right of the center clip is attached next. Holding the middle clip in place with your left hand, use your right hand to move the right edge of the weft as far as it will go around your head. Then place the clip on your hair just below the part, and moving the clip downward, catch your hair in the clip and snap it shut.
Finally, to attach the left clip, hold the middle clip in place with your right hand, and use your left hand to move the left edge of the weft as far as it will go around your head. Place the clip on your hair, moving the clip downward to catch your hair in the clip and snap it shut. Check for any gaps.
If you have a third weft you want to add, follow the same procedure you did for the second weft.
Step 12: Placement of the Side Wefts
The four 1.5" wefts from a 10 piece hair extension kit are meant to be attached to the sides of your head. Using two for each side, attach the first one just above the ear and the second one around the temple area following the same routine of creating a part, lifting the hair up above the part, placing the clip on your hair below the part line, moving the clip downward to catch your hair in the clip and snapping it shut.
Step 13: Removing the Extension Wefts
Never try to remove any extension wefts without opening all the clips- sides and center.
To remove an extension weft, snap open all the clips and gently lift up and away from your hair.
Pulling or tugging to remove a weft can result in damage to your own hair.
Practice opening and closing the clips in the extensions before you begin so you understand how they work and feel.
With the clip side of the extension piece facing you place both thumbs on each side of the clip, and your index fingers at the front side of the extension. You may snap the clip open by applying pressure towards yourself with your index fingers. Alternately, you may close the clip by applying pressure away from yourself with your thumbs.
~~~
How to: 16in FineLine Extension by Hairdo
The 16" Fineline Extension by Hairdo features hair that is stitched to a thin polyurethane layer, resulting in a lighter, thinner, virtually undetectable piece that lays flat to the head for a more comfortable, natural look.
~~~
How to: 16in Remy Human Hair 5pc Extension Kit by Hairdo
The 16" Remy Human Hair Extensions bring all the luxury, length and volume of expensive salon extensions by using 100% Remy human hair for the most natural look. These Hairdo extensions are made easy with invisible pressure-sensitive clips.
~~~
How to: 18in Remy Human Hair 10pc Extension Kit by Hairdo
This clip-in extension kit by Hairdo includes 10 pieces of 18-inch long, 100% Remy human hair extensions for stunning luxe volume and gorgeous length! Instantly achieve the look of expensive salon extensions without glue, tape or commitment. Cut and heat-style the extensions for a customized look.
The Steps for Applying a Weft Piece Kit
Clip in hair extensions are a great way to add length, volume, or color without causing damage to your own hair. They are a viable alternative to permanent extensions. At ElegantWigs.com™ you are able to choose from a refine selection of 100% human hair extensions in numerous colors and various lengths.
The instructions below for applying weft clip-in extensions is for a 10 piece kit, but can easily be adapted for any number of weft pieces. There are also lots of youtube videos showing how to attach extensions that might also be helpful.
Clip in hair extensions are a great way to add length, volume, or color without causing damage to your own hair. They are a viable alternative to permanent extensions. At ElegantWigs.com™ you are able to choose from a refine selection of 100% human hair extensions in numerous colors and various lengths.
Step 1: Practice Opening and Closing the Clip
Practice opening and closing the clips in the extensions before you begin so you understand how they work and feel.
With the clip side of the extension piece facing you place both thumbs on each side of the clip, and your index fingers at the front side of the extension. You may snap the clip open by applying pressure towards yourself with your index fingers. Alternately, you may close the clip by applying pressure away from yourself with your thumbs.
Step 2: Practice Attaching the Hair
Practice attaching the hair by using one of the 1.5" side pieces. Create a part line above your ear extending back along the side of your head where you want to attach the extension. Gather your hair up and away from your face. Work on attaching and removing the extension piece from just below the part line above your ear.
Steps 1-3 are all for practice purposes. Once you feel comfortable with these steps, proceed to Step 4.
Step 3: Practice Separating the Hair
Using a tail comb or your index fingers, practice parting the hair where you wish to attach the first extension.
The clip-in extensions should be attached from the bottom up. Starting at the lowest point on the hairline, and using the tail comb or your index fingers, create a part where you wish to section off the hair. Pull up the hair above the part line and gather it to keep it out of the way.
Step 4: Starting: The Lowest and First Part
You are now ready to start. These instructions are for the 10 piece extension kits.
The clip-in extensions should be attached from the bottom up. Starting at the lowest point on the hairline, and using the tail comb or your index fingers, create a part where you wish to section off the hair.
Lift up all the hair above the part and clip it out of the way.
Step 5: Prepare the First Weft Extension
Select one of the wider "back" wefts. If working with a complete kit, and you are planning on three layers of extensions, use the 6" width weft. You may use both 6" weft extensions on this lowest layer, if you wish.
Snap open all the clips.
Smooth out the hair, so the extension is easier to handle.
Step 6: Placement of the First Weft
With your hair above the part, pulled up and clipped out of the way, place the clips from the top edge of the weft onto your own hair below the part so that the top of the weft is even with the part.
Step 7: Placement of the First and Second Clip
The middle clip should be placed first. If you are using only one weft extension, locate the middle of the nape and place the center clip on your own hair just below the part. Moving the clip downward, catch your hair in the clip and snap it shut.
The clip to the right of the center clip is attached next. Holding the middle clip in place with your left hand, use your right hand to move the right edge of the weft as far as it will go around your head. Then place the clip on your hair just below the part, and moving the clip downward, catch your hair in the clip and snap it shut.
If you are using the two 6" extensions, you need to balance them around your head. The middle of the nape is where the two wefts should meet.
Step 8: Placement of the Third Clip
Finally, to attach the left clip, hold the middle clip in place with your right hand, and use your left hand to move the left edge of the weft as far as it will go around your head.
Place the left extension clip on your hair just below the part line. Move the clip downward, catch your hair in the clip and snap it shut.
Step 9: Check for Gaps
Now that all three clips are attached, run your fingers along the weft to make sure it lies flat against your head along the entire width of the first weft.
If there are any gaps, correct this by snapping the clip open, lifting it off your hair and repositioning it so that the weft lies flat.
Step 10: Preparing to Place the Second Weft
The second large weft will be placed above the first weft. Release all the hair that was clipped out of the way. Then, slightly above the weft that was just attached, make another part with the released hair by using a tail comb or your index fingers.
Lift up all the hair above the part and clip it out of the way.
Step 11: Placing the Second Weft
The middle clip should be placed first. Locate the middle of the nape and place the center clip on your hair just below the part. Moving the clip downward, catch your own hair in the clip and snap it shut.
The clip to the right of the center clip is attached next. Holding the middle clip in place with your left hand, use your right hand to move the right edge of the weft as far as it will go around your head. Then place the clip on your hair just below the part, and moving the clip downward, catch your hair in the clip and snap it shut.
Finally, to attach the left clip, hold the middle clip in place with your right hand, and use your left hand to move the left edge of the weft as far as it will go around your head. Place the clip on your hair, moving the clip downward to catch your hair in the clip and snap it shut. Check for any gaps.
If you have a third weft you want to add, follow the same procedure you did for the second weft.
Step 12: Placement of the Side Wefts
The four 1.5" wefts from a 10 piece hair extension kit are meant to be attached to the sides of your head. Using two for each side, attach the first one just above the ear and the second one around the temple area following the same routine of creating a part, lifting the hair up above the part, placing the clip on your hair below the part line, moving the clip downward to catch your hair in the clip and snapping it shut.
Step 13: Removing the Extension Wefts
Never try to remove any extension wefts without opening all the clips- sides and center.
To remove an extension weft, snap open all the clips and gently lift up and away from your hair.
Pulling or tugging to remove a weft can result in damage to your own hair.
Practice opening and closing the clips in the extensions before you begin so you understand how they work and feel.
With the clip side of the extension piece facing you place both thumbs on each side of the clip, and your index fingers at the front side of the extension. You may snap the clip open by applying pressure towards yourself with your index fingers. Alternately, you may close the clip by applying pressure away from yourself with your thumbs.